Amazon Simple Storage Service (S3) is widely known as a service for storing data and retrieving it from anywhere at any time. But besides storing data, S3 can also be used to host static WordPress websites, providing a cost-effective solution for certain sites. If you’re considering deploying your website on the AWS infrastructure, S3 should be one of the services you consider, especially if it mainly has static content. We will explore more about this in the next sections of the article.
As you might have guessed, S3 is not the ideal solution for all WordPress websites. That is why is crucial to clearly assess the needs of your website before deciding whether to use S3 or other AWS services like EC2 and Lightsail. Check out our EC2 vs Lightsail for WordPress to learn more. In this article, we will dive into the details of using S3 for WordPress hosting and also explore the categories of websites that suit this service. But first, let’s discuss the benefits of using S3 for hosting over other AWS services.
Why Use S3 For WordPress Hosting
These are some the reasons you may consider using AWS S3 as you’re the hosting solution for your WordPress website:
- Scalability and Reliability: Amazon S3 is designed to deliver virtually unlimited storage capacity with high availability and durability. This ensures your WordPress site remains accessible and performs well even during traffic spikes.
- Cost-Effectiveness: When compared to other AWS hosting solutions like such EC2, S3 is much more cost effective. It offers a pay-as-you-go pricing model, where you only pay for the storage and data transfer you use.
- Simplicity: S3 is primarily a serverless service, so you won’t need to set up or manage the underlying infrastructure that hosts your site. This simplifies the deployment process and reduces administrative overhead.
- Global Accessibility: S3 is a global service and it also allows users to distribute content to edge locations to enhance performance. This is done using Amazon CloudFront, AWS’s content delivery network (CDN) service to ensure fast content delivery.
- Integration with AWS Ecosystem: S3 integrates with most AWS services, which can be crucial for scaling and growing your site in future. By leveraging other AWS services like CloudFront for CDN or Route 53 for DNS management, you can further enhance the functionality of your WordPress site.
Websites Suitable for S3 Hosting
As we shared earlier, not all websites would work well with S3 hosting. Amazon S3 is an excellent choice for hosting static websites with fixed HTML pages, CSS, images, and videos. Static websites are made of web pages with static content and do not require dynamic content processing or database interactions. Some common examples of static websites include personal blogs, portfolio sites or small business websites for showcasing products or projects.
Steps For Hosting your WordPress Website on S3
Step 1: Setting up your S3 bucket
The very first thing you need to do is create an S3 bucket that will host your WordPress files.
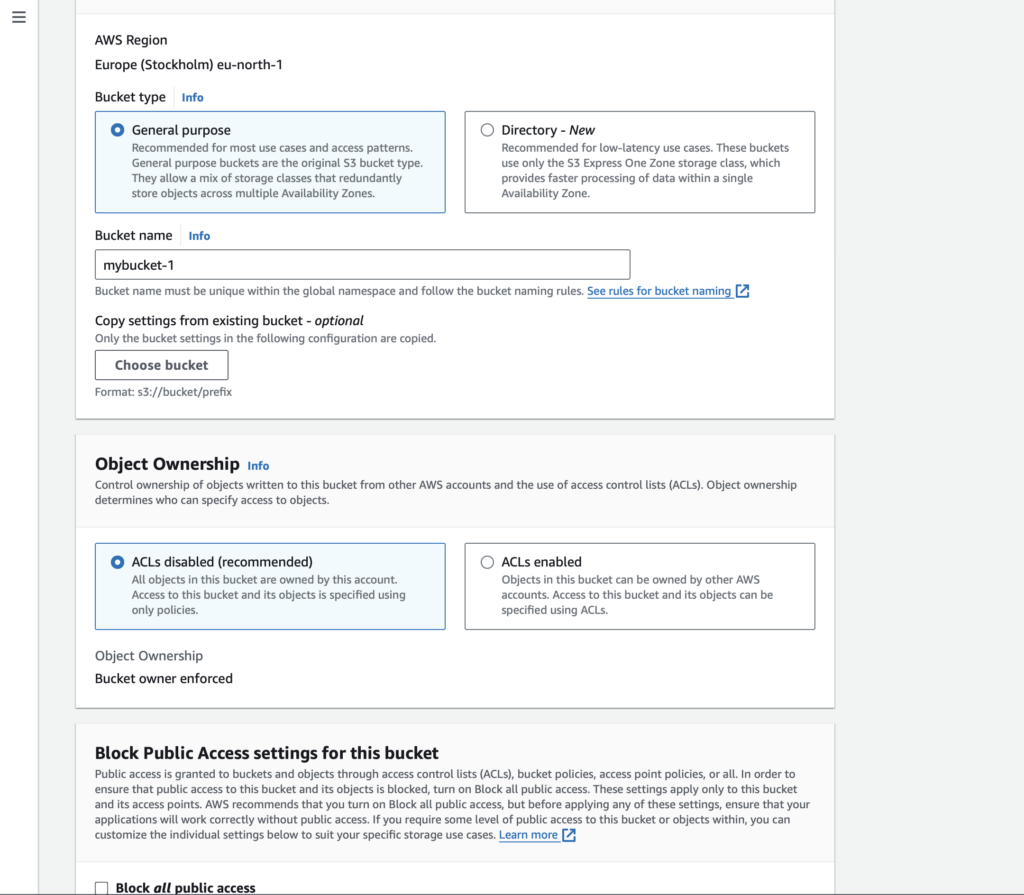
- Create S3 Bucket: Navigate to the AWS Management Console and sign in. Search for S3 using the services search box. While in the S3 dashboard, click “Create bucket.” Enter a unique bucket name.

- Configure Bucket Settings: These settings include choosing a region for your bucket and whether you would like to make the bucket files public. To make the bucket public, make sure to untick the “Block all public access” option because it is enabled by default. Keep all other settings as default unless you have specific requirements.
Step 2: Upload WordPress Files
- Prepare the files: Now that your bucket is ready, it is time to upload your website files. Prepare your WordPress files, including WP-config.php, index.php, wp-content, and more. If your WordPress site is currently hosted on another platform, you can access these files from the platform’s file manager in cPanel or similar dashboards. For most platforms, these files are located in the public_html directory folder.
- Upload the files: To upload these files from your computer, click on your bucket name, then click “Upload.” Drag and drop or select files to upload from your local machine to the S3 bucket.
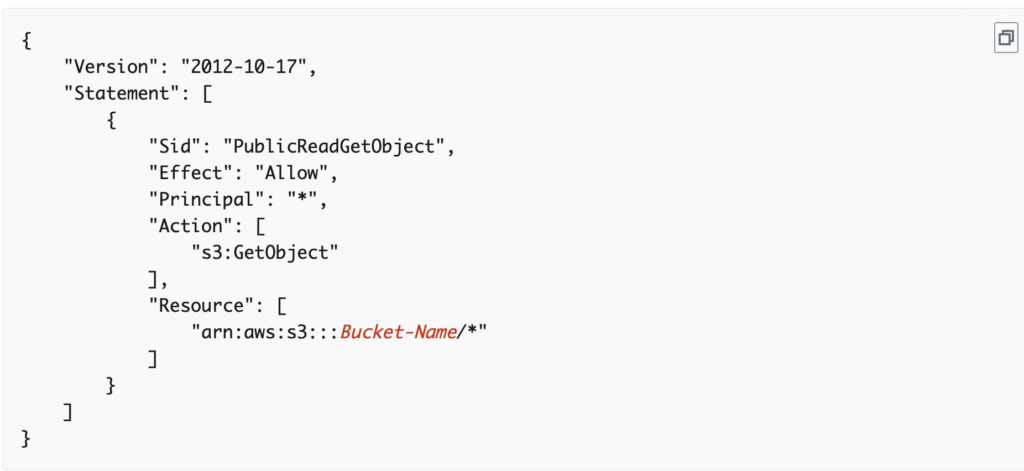
- Make Files Public: In the previous step, we enabled the public file access option. However, we also need to edit our bucket policy to ensure our site is fully accessible on the internet. Go to the S3 dashboard and select the bucket you created in step 1. Click the permissions options, scroll down and click on edit bucket. An empty text box will pop up where you will need to input your bucket policy (Json code). Your bucket policy should look like the screenshot below. Ensure to replace “Bucket-Name” with your actual bucket name.

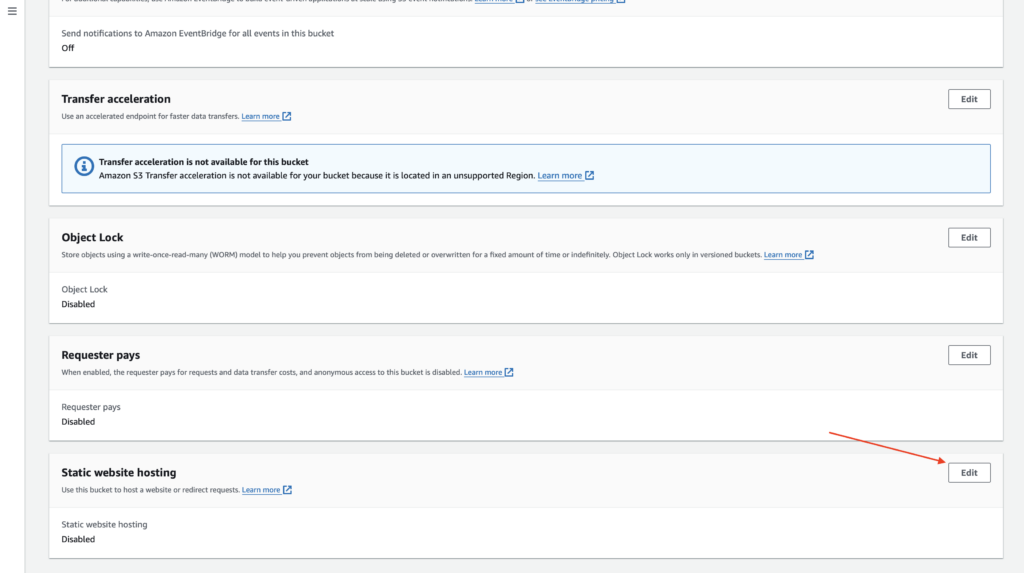
- More configurations: You will also need to enable the website for static website hosting. To do this, go to your S3 bucket properties scroll down to the Static website hosting section. Click edit and enable this option. Under the index document text box, type in index.html and save changes.

Step 3: Setting Up Route 53 for Domain Name
After creating your S3 bucket and uploading the files, you can now access them on the internet using your bucket’s URL such as https://your-bucket-name.s3.amazonaws.com/. However, this domain name doesn’t look neat and might not be easy for your target audience to remember. That’s why you will need to use Route 53 or any other DNS provider to create a short domain name that will then be redirected to your bucket URL. Follow these steps to set up Route 53:
- Navigate to Route 53: Within your AWS Management Console, go to the Route 53 service
- Create a CNAME record: Choose your hosted zone or create a new one. Click on “Create Record Set” and enter the desired subdomain (e.g., www.mywebsite.com) and select “CNAME” as the type.
- Wait for DNS Propagation: DNS changes may take some time to propagate (usually up to 48 hours).
Step 4: Secure Website using Amazon CloudFront
Amazon CloudFront is a content delivery network (CDN) service that speeds up the delivery of your web content to users worldwide by caching it at edge locations close to them. It ensures fast, secure, and scalable delivery of websites. Follow these steps to configure CloudFront for your website:
- Create a CloudFront Distribution: Go to the CloudFront service in the AWS Management Console. Click on “Create Distribution” > “Get Started” under the Web section.
- Set Origin Settings: Choose your S3 bucket endpoint as the “Origin Domain Name.” Leave other settings as default or configure according to your needs.
- Configure Default Cache Behavior: Under the “Default Cache behavior Section,” set “Viewer Protocol Policy” to “Redirect HTTP to HTTPS” for secure connections. You should also leave all the other settings in this section as default.
- Specify Distribution Settings: Under Settings, enter your S3 bucket endpoint as the “Alternate Domain Names (CNAMEs).” Choose “Custom SSL Certificate” and select the SSL certificate created in AWS Certificate Manager (ACM). If you don’t have an SSL certificate, click the “Request Certificate” option to create one. After requesting the certificate, it will take a few minutes to be ready. When ready, go back to your distribution settings and add it. You should now scroll down and click the “Create Distribution” option.
- Create Distribution: Review all settings, then click “Create Distribution.” Please note that it may take some time (usually 15-20 minutes) for the CloudFront distribution to deploy globally.
- Point your domain to CloudFront: Pointing your domain to CloudFront enhances website performance and security by leveraging CloudFront’s global network of edge locations. To do this, go to the Route 53 service in the AWS Management Console, select your domain’s hosted zone, choose your domain and click Edit Record. Under the alias section, replace your S3 URL with the CloudFront endpoint that you created in the previous step.
Step 5: Testing and Finalizing
After uploading your files to S3 and making the necessary configurations, it is time to test your website to ensure it works as intended. Open a web browser and navigate to your domain name and verify that it is accessible and secure (HTTPS). If there are issues accessing WordPress or SSL errors, review settings in S3, CloudFront, and Route 53. You should also ensure proper maintenance of the site by monitoring CloudFront, S3 usage, and updating WordPress files and SSL certificates as needed.
Final Thoughts
Amazon S3 offers a scalable, cost-effective, and simple solution for hosting static WordPress websites. However, it’s not a one-size-fits-all solution. Therefore, start by assessing your website’s features before choosing S3. If your site primarily consists of static content, S3 offers a compelling and affordable option. But for dynamic sites requiring database interaction, traditional hosting remains the way to go. This could involve virtual machines on EC2 or Lightsail, or hosting solutions on other cloud infrastructure platforms.